 I've recently purchased a robot, based on a board that is Arduino Uno compatibile, called mBot.
It has a lot of interesting features that make it suitable for teaching, and its price is really interesting (nearly 80 euros/80 US dollars). It is made by MakeBlock and I'll present its main features in an upcoming post.
This post is about the possibility to command it without its default editor, mBlock (a really good one, indeed; see http://www.mblock.cc/), but using App Inventor. I'm interested in App Inventor because I teach it in my classes and I enjoy writing apps for Android that will command mBot.
This post is about the possibility to command it without its default editor, mBlock (a really good one, indeed; see http://www.mblock.cc/), but using App Inventor. I'm interested in App Inventor because I teach it in my classes and I enjoy writing apps for Android that will command mBot.
From App Inventor to mBot: how communication works
mBot uses a custom protocol in order to send commands to the robot and receive results or values from the robot's sensors. This protocol is called Orion and you can find all the details here.
The first app I've written uses a really simple command to change the color of the two RGB leds.
The command has this general form (every number is expressed in base 16):
ff 55 09 00 02 08 07 02 [led] [Red] [Green] [Blue]
Instead of [led] you must specify the led for which you would like to change the color (1 means left, 2 right, 0 both). Instead of[Red] you have to specify the intensity of Red component of RGB (values from 0 to 255) and the same must be done with [Green] and [Blue] values (for an explanation of RGB color see, for example, this link).
Every time you change a slider, a button background will change its color, showing the resulting RGB color. When you press the button, it will communicate the new color to the device.
I've inserted also two check boxes: you can select the leds that you want to change (left, right or both).
We need a Bluetooth client in order to send commands to the robot.
The resulting app will look, in App Inventor designer, like in the image below.
Now it's time to do the appropriate program in the Blocks editor.
First of all, we populate the ListPicker with known devices. Also when the user chooses one device, if the connection goes well, we will show the other commands.

Every time a slider changes its position, we manage the change invoking a procedure called cambiaColore (i.e. changeColor) that reads the floor value of every slider and uses it to change the background color of the button.
Please notice that I've used the Send1ByteNumber method to send every number (converted in decimal base).
Now, every time the user clicks on the button, we send the previous command to the robot, using the bluetooth connection, and the additional details about choosen colors:


If you need the AIA file (source file for App Inventor), please check this link.
 |
| mBot with its RGB leds |
Building the app
Opened App Invetor, I've chosen to use a ListPicker component in order to select the bluetooth device to communicate with (please notice that the device must be paired from Android). When you choose that device, three sliders should appear (one for any color component: Red, Green and Blue).Every time you change a slider, a button background will change its color, showing the resulting RGB color. When you press the button, it will communicate the new color to the device.
I've inserted also two check boxes: you can select the leds that you want to change (left, right or both).
We need a Bluetooth client in order to send commands to the robot.
The resulting app will look, in App Inventor designer, like in the image below.
 |
| App Inventor - Designer editor |
Now it's time to do the appropriate program in the Blocks editor.
First of all, we populate the ListPicker with known devices. Also when the user chooses one device, if the connection goes well, we will show the other commands.

Every time a slider changes its position, we manage the change invoking a procedure called cambiaColore (i.e. changeColor) that reads the floor value of every slider and uses it to change the background color of the button.

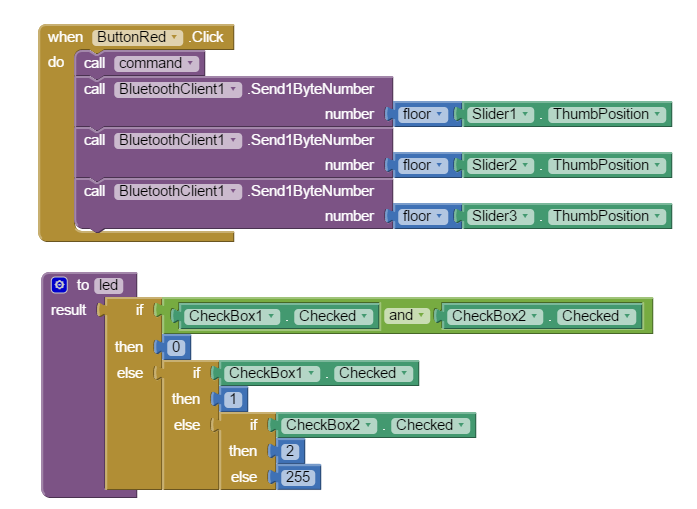
Now it is time to write a procedure, called command, that sends the initial bytes of the protocol. The last one is set using the values of the selected checkboxes.

Please notice that I've used the Send1ByteNumber method to send every number (converted in decimal base).
Now, every time the user clicks on the button, we send the previous command to the robot, using the bluetooth connection, and the additional details about choosen colors:
Conclusion
In this post I've showed the possibility to command an mBot from App Inventor, using commands sent via Bluetooth. The protocol allows to send commands but also to receive data, for example from sensors. So you can design an app that interacts with the robot in a lot of useful and interesting ways. Please let me know if you build something with your robot!

If you need the AIA file (source file for App Inventor), please check this link.


6 commenti :
Does this mean I could then use app inventor to make the robot do a string of events, such as drive forward turn around and come back?
Yes, you can! In order to achieve this you have to learn how movement commands aresent via Orion.
I'm an IT teacher and I found your post very interesting. Congratulations from France.
Thank you, it was very useful to me.
For everyone interested in programming mBot with App Inventor 2, please refer to this page for an extension made available from bBot team: http://learn.makeblock.com/en/use-mbot-with-app-inventor-v-1-9/
With it, you can use new programmig blocks from App Inventor editor for interacting with mBot without the need to use a low level protocol as described in my post.
Happy coding!
Great! THanks for your post from Spain
Posta un commento